M-Pesa statement is a summary that details all of your Mpesa operations for a specific time period. The statements are divided into two types: full statements and mini statements. Mpesa mini statements only display recent Mpesa transactions that are at least an hour old, with a limit of five transactions. The full statement, on the other hand, displays M-Pesa transactions for up to 12 months. Being aware of how to access your Mpesa statements helps you keep track of your money and account for it.
This article is going to show you various options on how to access your Mpesa statement using your phone
1. Using the USSD Function
- First dial *234# and then select the “My Mpesa Information” option.
- Choose ‘Mpesa statement’.
- Then select Request Statement and hit the send button.
- Next, choose ‘Full Statement.’ then choose the time period for which you want to get the full M-Pesa statement: for instance, the last 6 months or 12 months.
- Enter your official email address, confirm the email, and then enter your M-Pesa PIN.
- You will be notified by text message whether your registration was successful. Your Mpesa statement will be emailed to you.
How to Download Your Mpesa Statements
Log in to your personal email and look for the Safaricom email that contains your statement. It is important to note that the Mpesa statement email is password protected.
When requested for a password, simply show the identification card number associated with your Mpesa line, such as your National ID Card, Passport number, Military or Diplomatic Identification Card number.
The second most convenient way to obtain your Mpesa statement is via the Mpesa app, which allows you to examine, interact with, and act on your full M-Pesa statement immediately from the app’s home screen, as well as filter, download, and export your Mpesa statement in PDF format. Let’s see how the M-Pesa application works and how to use it step by step:
2. Using the M-PESA App
Begin by downloading the M-PESA app from either Google Play or the App Store. Then, follow the setup instructions to help you view your M-PESA transaction statements. While you must enter an email address when registering, you can choose to update it afterward.
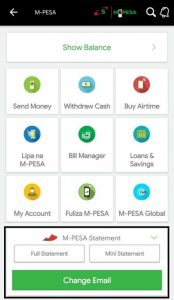
Open the M-PESA option on the app’s start page, then expand the M-PESA Statement option at the bottom of the screen to show two buttons you’ll use to request a Mini Statement or Full M-Pesa Statement.

Below these two buttons is an option for changing the email address to which the M-Pesa statement will be sent.
Checking Your M-PESA Statements Online
You may choose to use Safaricom Self-care to download your Mpesa statement online. Safaricom’s self-care service enables customers to easily manage their Safaricom account online through the Self-care portal.
Simply enter www.safaricom.co.ke in the address bar of your web browser and wait for the portal dashboard to fully load.
- Select self-care.
- Choose the type of registration you want to perform
- If it is for your own needs, choose an individual.
- Enter your phone number and username. Be aware that the Safaricom portal login requires the same username and password you entered at registration, so don’t forget it.
- Then agree to the terms and conditions after which you’ll receive the account activation number through your phone.
- Enter the activation number to finish the procedure.
After entering all of the required information, you should get a verification SMS on your mobile phone.
Note:
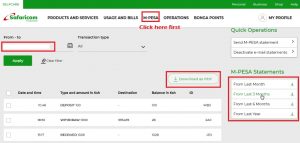
Once you access the portal, you can try selecting a specified time frame since you have access to a calendar to select particular dates. The time frame, on the other hand, is only valid for 12 months using the From Last Year option. If you require M-PESA statements for more than 12 months, Safaricom recommends using the USSD option to obtain records for a maximum of 24 months.
